
Quick start
Adding a SoundFont with MPTK is easy. A quick summary could be:
- Download a SoundFont from the large number of web site which propose SoundFont.
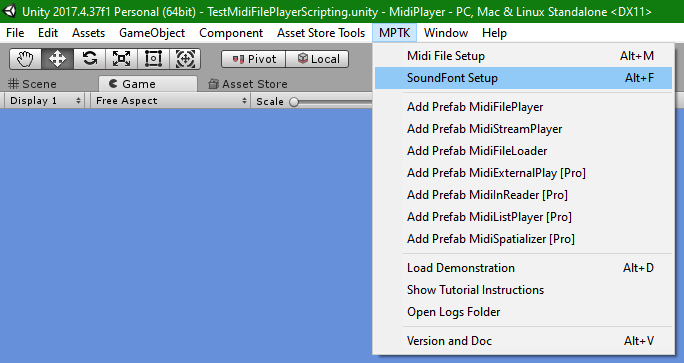
- Go to the menu Maestro Unity menu: SoundFont Setup
- Click on button Import SoundFont
- Click on Button Extract All Presets
- And that’s all!
Now, you will need more detailed information to better understand what you have done. So, please take the time to read this page!
What is a SoundFont?
The MPTK synthesizer is based on SoundFonts. It’s a kind of library which contains the samples associated to each instruments (as piano, sax, drum, …). The description of how to use each sounds for each keys, velocities, effects, controllers is quite complex. Happily the complexity is hidden by Maestro!
A SoundFont can contains hundreds samples and instruments. Moreover hundreds SoundFont are available on the web!!! for free or not, with different styles (general, classic, jazz, electro, hip hop, …), with different quality and size. The possibilities are huge, quite infinite!
SoundFont(R) is a registered trademark of E-mu Systems, Inc.
Tip: the Free version of Midi Player Tool Kit use the SoundFont GeneralUser GS v1.471 from Christian Collins site. It’s a SoundFont with a very good balancing between size and quality.
Maestro Midi Player Tool Kit Pro is able to use others SoundFonts, optimize the samples list, load and switch between SoundFont when your application is playing:
- Keep only banks of interest for your application.
- Analyze your Midi files to keep only necessary samples.
- API to load SoundFont when running.
- API to switch between SoundFont.
So, you keep a low volume of files for your application or game.
Download SoundFonts
Find and download interesting SoundFonts here:
- GeneralUser GS v1.471 from Christian Collins site
- Polyphone sorted by category and search engine.
- Ultimate List of Free Soundfonts
- Cymatics
- Soundfonts 4U
Create or Modify SoundFonts
It’s an option, really not mandatory for MPTK, pass this chapter if you want!
To be clear, Maestro does not provide full functions for editing SoundFont. There is a reason for that: there is powerful tools, often for free, to modifying in depth SoundFonts. However, Maestro is able to optimize the contents of the SoundFonts! see below.
Have a look to these two applications for editing SoundFonts:
- Viena. Free and exhaustive functions. Interesting also for understanding how works a synthesizer based on SoundFont.
- Polyphone. Free and easy-to-use. Perfect for copy / paste presets between SoundFonts. Also there is an On-line SoundFonts repository with a powerful search engine. A must have!
Tips: try General Midi SoundFont to get a large variety of instruments and a compatibility with Midi norm.
Add a new SoundFont to Maestro Pro
- Download SoundFont on your computer, see above.
- Go to the menu Unity menu MPTK “SoundFont Setup”
This popup windows is displayed (empty if no SoundFont already exists):

See bellow, the description of each panel of this window.
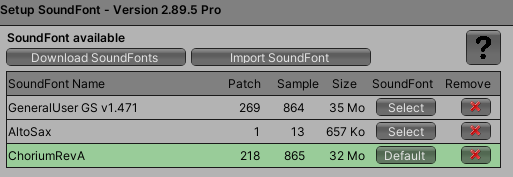
Panel “SoundFont available”
This panel displays your list of SoundFont available for your project. You can add, remove or select SoundFont. Some information are displayed in the list: count of patches, count of waves, total size.
- Download SoundFont, get some useful links to find and download SoundFonts included the default SoundFont used by the free MPTK version.
- Import SoundFont, select a SoundFont from your computer (filename of type .sf2). A first and quick analysis is done. Any samples are extracted, another step is needed. See “extract All”.
- ? This page!
In the SoundFonts list:
- Default / Select: select the default SoundFont to use when playing Midi files. Only one SoundFont can be selected at a time. But it’s possible to change the default SoundFont when running. See API documentation.
- X : delete definitively the SoundFont and all samples associated to it .
Panel “Banks available“
A SoundFont is composed of banks, each bank contains a set of patches (or preset or program which are synonyms), each patch can play one or more samples regarding the velocity and the key number, simultaneously or not … It’s a complex structure, happily, Maestro hides this complexity.
How that works?
- When a bank is selected with the Controller MIDI Message Bank Select LSB and MSB, the preset (instrument to be played) will be search in priority in this bank.
- bank select can be defined in the MIDI file,
- or by the Maestro API.
- Sadly, most of the MIDI Files don’t contain bank select event. It’s quite normal because there is no really norm to defined the content of a bank, there is just some habits.
- So, in Maestro, default banks are selected automatically:
- One for the chromatic instruments (piano, sax, …).
- This bank is used for all channels other than 9 (channel number starts with 0 with Maestro).
- Default bank: first bank in the SoundFont.
- One for the percussion instrument (drum …).
- This bank is used by Maestro when the channel is 9.
- Default bank: last bank in the SoundFont.
- But you can change the default Maestro banks depending on your SoundFont with this panel.
- One for the chromatic instruments (piano, sax, …).
You can manage banks in the top right sub windows:

SoundFont bank view
- Checkbox column Keep: choose the banks you want to keep or remove to decrease the size of your application. Banks, relevant presets and waves will be stripped.
- Checkbox column Instrument (for chromatic instrument) : choose your default bank for Instrument as Piano, Sax, Organ, Guitar. Often the first bank contains a well selected variety of instruments.
- Checkbox column Drum (percussion instrument): choose your default bank for Drum Kit sound. Often the last bank.
Tips: if you don’t hear drums when playing MIDI file, first verify that the right bank has been selected for the percussion.
Panel “Extract Presets & Samples”
It’s the last step: choose the samples format and extract patches (synonym for preset) and samples from the SoundFont.
In doubt, keep the default value. Some choice could created unwanted results!

Next you have the choice : optimize your presets list depending on the Midi files defined in MPTK or get all presets and samples available.
![]()
- Button Extract Only Required Presets: each Midi Files (here, how to add Midi files in MPTK: Midi File Setup) are analyzed to detect presets and samples used. Presets and samples not used are stripped from the SoundFont to reduce the size of your project.
- Button Extract All Presets: keep all patches and samples from the selected banks.
- Check that you have patches and samples after the extraction:
Warning: Extracting samples can take a while if the SoundFont is huge. From some tens of seconds to tens of minutes. During this extraction, the Unity editor is locked and don’t react to your input. Be patient! This action is only necessary at the first loading of a SoundFont.
When done, the left right sub panel displays some information about the extraction. You can save logs, open folder with the logs, clear the logs.
Tips:
- Free Version is published with the SoundFont “GeneralUser_GS_SoftSynth_v144”. It’s a free sound font with a good balancing between size and quality but you can’t change it. To download the same SoundFont as for the free version, you could visit the excellent Christian Collins’s site.
- Christian Collins site here
- and search for GeneralUser GS SoftSynth version 1.44.
- Demo video here
- Don’t forget to ask authorization for copyrighted resources!